

How to Optimize Images for the Web and WordPress
To optimize images for the web, resize each image to the size it's shown at, compress it without visible loss and pick the right format. This guide has real before/after numbers from our own blog, the best image size for each slot on a page, what PageSpeed's image warnings mean, and how to compress a WordPress Media Library in place, by hand or with an AI agent.
On this page· 10 sections
Images are usually the heaviest part of a page. A single photo saved as a 1.7 MB PNG can outweigh all the HTML, CSS and JavaScript on the page, and on a phone it's often what decides how fast the page feels.
The fix isn't complicated: resize, compress, pick the right format. This guide shows each step with numbers we measured on our own blog, then covers WordPress, where images need a little more care, and how to hand the whole job to an AI agent. For file names and alt text, the part of an image that search and AI engines read, see Image SEO for WordPress.
The short answer:
- Resize each image to about twice the width it's displayed at (1440 px for a 720 px content column).
- Compress it: WebP at about quality 75, or JPEG at 75–82.
- Use WebP or JPEG for photos, and PNG or lossless WebP only for screenshots and graphics.
- Aim for under 200 KB per content image.
What we measured on our own blog
We took nine images from this blog: four AI-generated cover illustrations, one photo and four screenshots or diagrams. We ran each one through the encoder behind AuditAE's optimize_image tool twice:
- WebP for a 1440 px slot. We asked for WebP with
max_width: 1440, twice our 720 px content column. That's what an agent gets when it asks for a 1440 px slot on a site that isn't WordPress. WebP is the tool's default format there; the default width is 1920 px. - Same format, full size. That's what in-place WordPress compression does: the file keeps its type, name and dimensions.
Nothing was uploaded or billed; we called the encoder directly on the files. Sizes are in KB (1,000 bytes). Two terms you'll see: near-lossless WebP nudges pixel values very slightly, too little to see on text or edges, and a palette PNG cuts the image down to at most 256 colors.
| Image | Pixels | Before | WebP, 1440 px slot | Same format, full size |
|---|---|---|---|---|
| Cover illustration (PNG) | 1659×948 | 1,913 KB | 761 KB (−60%) | 733 KB (−62%) |
| Cover, photo-like (PNG) | 1536×1024 | 1,689 KB | 122 KB (−93%) | No saving, left as is |
| Cover illustration (PNG) | 1672×941 | 1,330 KB | 536 KB (−60%) | 510 KB (−62%) |
| Cover illustration (PNG) | 1672×941 | 1,117 KB | 468 KB (−58%) | 374 KB (−66%) |
| Photo (JPEG) | 1536×1024 | 285 KB | 87 KB (−70%) | 140 KB (−51%) |
| Screenshot (PNG) | 1920×1208 | 163 KB | 99 KB (−39%) | 51 KB (−69%) |
| Screenshot (PNG) | 1920×1682 | 157 KB | 86 KB (−45%) | 58 KB (−63%) |
| Diagram (PNG) | 1920×852 | 148 KB | 84 KB (−43%) | 44 KB (−70%) |
| Screenshot (PNG) | 1920×1000 | 54 KB | 22 KB (−59%) | 16 KB (−70%) |
| Total | 6,855 KB | 2,264 KB (−67%) | 3,615 KB (−47%) |
How each one was encoded:
- The illustrations, screenshots and diagram were read as graphics: near-lossless WebP in the WebP column, a palette PNG in the same-format column. The three illustrations ended at 1280 px wide; more on that below.
- The photo-like cover got lossy WebP at quality 82, where the tool starts for a photo saved as PNG.
- The photo got WebP at quality 75, or JPEG at quality 78 when it kept its format.
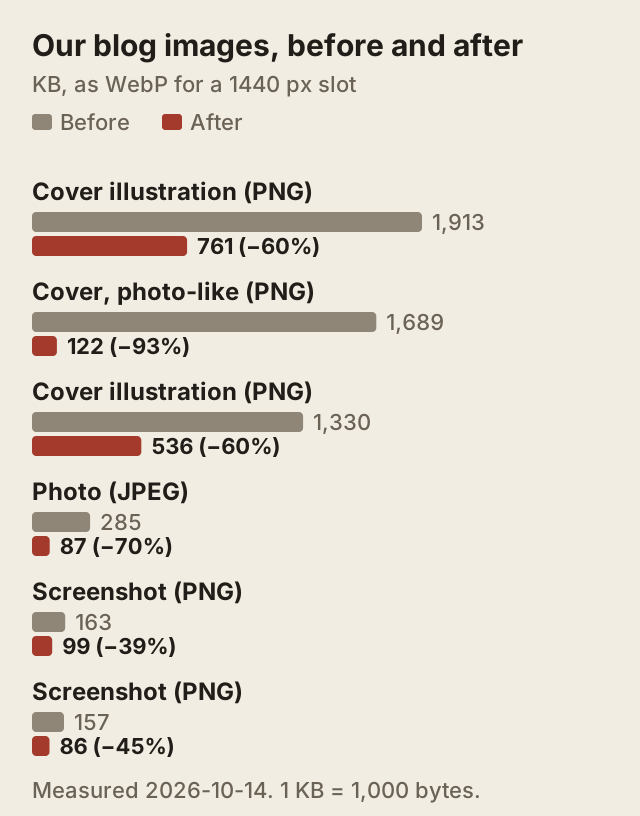
What the numbers say:
- The wrong format costs the most. The photo-like cover was saved as PNG. As WebP it dropped 93%. Kept as PNG, a lossless re-encode came out bigger than the original, so the tool left it alone and didn't charge for it.
- Screenshots shrink well and stay sharp. The tool treats them as graphics. It never uses ordinary lossy compression on them: only lossless or near-lossless WebP, or a 256-color palette PNG when the format stays PNG, each checked against the original. Every one of them passed that check.
- Resizing a screenshot doesn't always make it smaller. Our screenshots were smaller as lossless WebP at full size (17–55 KB) than near-lossless at 1440 px (22–99 KB). Shrinking a flat image blends the edges into new in-between colors, which lossless compression handles worse. Resize screenshots when the displayed size is much smaller; otherwise just compress them.
- Our illustrations stayed over 200 KB. The tool read three of the AI-generated covers as graphics, so it used near-lossless compression only. While an image is still over 200 KB, the tool narrows it 20% at a time, but never below 1280 px. These three hit that floor and still ended above the line. They have no small text, and a lossy WebP would have been fine. That's a deliberate trade: the tool protects text and UI edges first, and here it cost us.
What Next.js already does for us
Be fair to the framework: our cover images are shown with Next.js's image component, which resizes them and serves WebP on the fly. The 1,913 KB cover reaches a browser as a 103 KB WebP at its full width, or 59 KB at 1080 px wide (measured on our live site on 2026-10-14). That beats the tool's near-lossless output for that image.
But not every image goes through it. The screenshots inside our posts are plain <img> tags, so they're served as the original PNGs. Our share cards (og:image) also point at the raw cover files, so social networks fetch the full 1.9 MB.
That's the general pattern. Framework pipelines and image CDNs help a lot, but plenty of images skip them: raw uploads, WordPress Media Libraries, CMSs without an image CDN, images in Markdown, and share images. Those are the ones PageSpeed and a site crawl keep flagging.
How image size affects page speed
Images rarely block the page from rendering, but they add up in two ways:
- Largest Contentful Paint (LCP). On most pages the largest element in view is an image: the hero, a product photo or a featured image. Google's Core Web Vitals count LCP as good under 2.5 seconds. A 1.5 MB hero on a mobile connection can take most of that budget on its own.
- Total page weight. Every image still downloads once the visitor scrolls near it, uses their data plan and competes with everything else for bandwidth. Lazy loading helps with timing, not with size.
The bigger the gap between an image's file size and its displayed size, the more you waste. A 4000 px phone photo shown in a 720 px column sends about 30 times the pixels the slot holds.
Step 1: Find your heaviest images
Start with a list, not with your favorite page.
PageSpeed image warnings: Improve image delivery, Properly size images, Avoid enormous network payloads
Run your key pages through PageSpeed Insights. The image warnings you'll see:
- Improve image delivery. Since Lighthouse 13 (October 2025), this one insight replaces four older audits: "Properly size images", "Efficiently encode images", "Serve images in next-gen formats" and "Use video formats for animated content". If you're following an older guide that names those, this is where they went.
- Avoid enormous network payloads. The page's total weight is high. Images are usually most of it.
- The LCP element. The report names the element behind your Largest Contentful Paint. If it's an image, fix that one first.
Every large image on the site
PageSpeed checks one page at a time. AuditAE's Site Audit crawls the whole site (1¢ per 10 pages) and flags every internal image over 200 KB, largest first, with the pages that use it. It also flags images without width and height attributes, which cause layout shift.
There's no official size limit. 200 KB is the line our crawl uses for a content image; heroes can go a little over, thumbnails should be far under.
Step 2: Resize to the size it's displayed at
Resizing usually saves more than any compression setting. The rule: about twice the width the image is displayed at, so it stays sharp on high-density screens, and no bigger.
Best image size for a website
| Slot | Width to export | Notes |
|---|---|---|
| Full-width hero or banner | 1920–2560 px | The only place wider images pay off |
| Content image in an article | 2× the column width (1200–1600 px) | Our column is 720 px, so 1440 px |
| Featured image / share card | 1200×630 px | Also the usual og:image size |
| Card or grid thumbnail | 2× the card width (400–800 px) | Crop to the ratio the card uses |
| Logo and icons | SVG | Vector, so it's sharp at any size |
If your site serves several sizes with srcset (WordPress does this for you), export at the largest size the page needs and let the browser pick.
Two things don't matter as much as people think. A 1920×1080 screen doesn't call for 1920 px images: most content columns are 650–800 CSS pixels wide, so size for the slot, not the screen. And DPI does nothing on the web: browsers use only the pixel dimensions, so 72 and 300 DPI look and weigh the same.
Step 3: Compress without visible loss
There are two kinds of compression:
- Lossy (JPEG, lossy WebP, AVIF) throws away detail the eye is unlikely to miss. It's right for photos and photo-like images. For WebP, quality 70–80 is usually invisible on a web page; for JPEG, 75–82.
- Lossless (PNG, lossless WebP) keeps every pixel. It's right for screenshots, UI, diagrams and anything with small text, where lossy compression smears edges.
Two habits help. Strip metadata such as camera EXIF data, which does nothing on a web page. And compare the result with the original at 100% zoom before you replace anything; a quality number alone can't tell you whether this image survived.
optimize_image follows the same rules. Photos start at WebP quality 75 (82 for a photo saved as PNG, JPEG 78 when the format is kept). Graphics never get ordinary lossy compression: they get lossless or near-lossless WebP, or a palette PNG. Every lossy output is compared against the source, and when the difference would be visible, the tool stops stepping down, even if that leaves the image over 200 KB.
Step 4: Pick the best image format for the web
For context, here are three of our images at 1440 px in each format. We made these with the same image library (sharp) at its common settings, outside the tool. Quality scales differ between formats, so compare the sizes loosely.
| Format at 1440 px | Photo-like illustration | Photo | Screenshot |
|---|---|---|---|
| PNG (lossless) | 1,904 KB | 1,386 KB | 184 KB |
| JPEG, quality 78 | 145 KB | 128 KB | 71 KB |
| WebP, quality 75 | 94 KB | 84 KB | 46 KB |
| WebP, lossless | 1,121 KB | 869 KB | 128 KB |
| AVIF, quality 50 | 64 KB | 55 KB | 32 KB |
The PNG row is plain PNG at sharp's default settings, which is why the illustration is bigger here than our original file.
JPEG vs PNG
JPEG for photos, PNG for screenshots, logos and anything with transparency. A photo saved as PNG is the most expensive mistake on this list: the photo-like column above is 13 times bigger as PNG than as JPEG.
WebP vs PNG
For screenshots and graphics, lossless WebP is usually smaller than PNG and looks identical. For photos, lossy WebP beats both PNG and JPEG. Every current browser supports WebP. The catch is tooling: some email clients, older CMSs and design tools still expect JPEG or PNG.
AVIF vs WebP
AVIF is smaller again, about a third smaller than WebP in our photo tests. It takes longer to encode, and fewer tools can create or edit it. Next.js's own documentation still recommends WebP for most cases and makes AVIF opt-in. If your image CDN can serve AVIF to browsers that ask for it, let it; otherwise WebP is the practical default.
When to keep the format you have
Changing a file's format changes its URL (hero.png becomes hero.webp), so every reference has to change too: the img tags, srcsets, CSS backgrounds, share-card tags and structured data. On WordPress, where the Media Library ties all of those to the file's name, compressing in place and keeping the format is often the better trade. That's what AuditAE's in-place compression does, and why it doesn't convert to WebP.
Do it with an AI agent
If you use Claude, ChatGPT or Cursor, the AuditAE MCP server lets the agent do steps 1 to 4 for any website. One prompt is enough:
Crawl example.com, find every image over 200 KB, and shrink them. Show me the before and after before I replace anything.
The agent runs crawl_site (1¢ per 10 pages), reads the large_images check with get_crawl_issue (free), then calls optimize_image with the site: up to 20 images per call, largest first. For a single file, give it the URL and the display width:
Optimize https://example.com/images/hero.png for a 1440 px slot.
Each image comes back with its size before and after, a private download link that lasts 48 hours, and a paste-ready <img> tag. One item looks like this (the numbers are our photo's from the table above; the download link and timestamp are shortened):
{
  "url": "https://auditae.app/blog/how-to-show-up-in-chatgpt-results.jpg",
  "status": "optimized",
  "before": { "bytes": 285428, "width": 1536, "height": 1024, "format": "jpeg" },
  "after": { "bytes": 86794, "width": 1440, "height": 960, "format": "webp" },
  "saved_bytes": 198634,
  "saved_pct": 70,
  "quality_used": 75,
  "download_url": "https://…",
  "filename": "how-to-show-up-in-chatgpt-results.webp",
  "expires_at": "2026-10-16T…",
  "snippet": "<img src=\"https://auditae.app/blog/how-to-show-up-in-chatgpt-results.webp\" alt=\"\" width=\"1440\" height=\"960\" decoding=\"async\">",
  "references_to_update": ["img src and srcset", "CSS background-image", "og:image and twitter:image", "JSON-LD image", "<link rel=preload as=image>"],
  "billed": true
}
references_to_update is there because the file name changed from .jpg to .webp. If you'd rather keep names and formats, ask for format: "original". That's the default on WordPress sites and for images behind next/image, where the file has to replace the old one as it is.
With the site's code open (Claude Code or Cursor), the agent can swap the files and update the references itself. On a site builder such as Webflow, Shopify or Squarespace, you upload the new files in place of the old ones. Then the agent calls submit_urls and re-crawls to confirm the warning is gone.
What it costs: 1¢ per 5 images optimized, rounded up per call, so 20 images cost 4¢. Images that save less than 10 KB or 10% are free and aren't returned. Errors and skipped files (SVG, animated GIF) are free. The same image again within 24 hours is free, and you still get the link. New accounts get $5 of credit. The same tool is in AEBOT, the assistant in the AuditAE dashboard ("shrink the large images"), and in the REST API at POST /api/v1/images/optimize.
How to optimize images in WordPress
WordPress does part of the job already. Knowing which part saves you from fixing the wrong thing.
What WordPress already does
- It scales very large uploads. Since WordPress 5.3, an image wider or taller than 2560 px is scaled down to 2560 px and saved as a new file with
-scaledin its name, which becomes the image's full size. The original stays on the server. The limit is thebig_image_size_thresholdfilter. - It creates thumbnail sizes. From each upload it generates thumbnail (150×150, cropped), medium (300 px), medium_large (768 px wide), large (1024 px), 1536 and 2048 px sizes, plus any your theme or plugins add, and lists them in each image's
srcsetso browsers can pick a smaller one. - It saves those sizes at quality 82. That's WordPress's default for JPEG; WebP sizes get 86.
What it doesn't do is compress the file you uploaded. If you upload a 1.5 MB JPEG under 2560 px, the full size stays 1.5 MB. That's the file used wherever the full size is shown: lightboxes, blocks set to "Full Size", and often share cards.
WordPress thumbnail sizes, and why they still weigh a lot
One upload becomes six or more files, each re-encoded from the original at a fixed quality with no check of how much it could shrink. Pages mostly load those sizes, not the original, so a fix that only touches the full-size file misses most of what visitors download. Any WordPress compression worth using has to handle every size.
Compress the Media Library in place with the AuditAE plugin
The free AuditAE plugin (0.35.0 and later) lets an agent compress Media Library images where they are. Pair the plugin with your AuditAE account, turn on Write SEO settings in Settings → AuditAE, and connect Claude, ChatGPT or Cursor to the WordPress MCP server, or use AEBOT in the dashboard. Then ask:
Compress the largest images in my WordPress Media Library. Do a dry run first and show me the savings.
The agent calls wp_optimize_media with dry_run (free), shows you what would change, and runs it on your go-ahead. For each image:
- The file is replaced in place. It keeps its name, URL and format (JPEG, PNG or WebP), so posts, srcsets and share cards use the smaller file with nothing to re-link.
- Every thumbnail is compressed too, each from its own file at its own size, so a theme's crop or a hand-made crop stays exactly as it was.
- Originals are backed up before anything is swapped. Restore original in the Media Library puts them back in one click, without the agent; the agent can also call
wp_restore_media(free).
It's careful by default. It skips GIFs, SVGs and animated images, files offloaded to cloud storage, and protected folders such as WooCommerce's private downloads. It stops if another image optimizer (Smush, ShortPixel, EWWW, Imagify, Optimole and others) is active, unless you tell it to go ahead, and it leaves alone images that already have WebP or AVIF copies made by another plugin. It never converts to WebP.
By default it takes the largest JPEG, PNG and WebP files over 200 KB that it hasn't compressed yet, a few per call, at up to 2560 px wide. It costs 5¢ per call plus 1¢ per 5 images replaced, so five images cost 6¢, and only when at least one image is replaced. Dry runs, skips and images that barely shrink are free.
Our own measurements above show what to expect from keeping the format: about half the bytes overall, more on screenshots, and nothing on a photo saved as PNG. For that case, the better fix is to re-export it as JPEG and upload it again.
WordPress image compression plugins: AuditAE vs Smush, ShortPixel, Imagify, EWWW and Optimole
These plugins compress images automatically as you upload them, and most also convert to WebP. AuditAE works differently: an agent finds the heavy images and fixes them on request, and you pay per image instead of per month. What each one offers, from their WordPress.org pages and pricing pages, checked on 2026-10-14:
| Plugin | Free tier | Thumbnails | Restore | WebP / AVIF | AI agent access |
|---|---|---|---|---|---|
| AuditAE | Plugin free, pay per image¹ | Yes | Yes, one click | Keeps the format | MCP and AEBOT |
| Smush | Skips files over 5 MB | Full size is Pro² | Backups³ | Pro only | — |
| ShortPixel | 100 credits a month⁴ | Yes | Yes, one click | Both | MCP in the plugin⁵ |
| Imagify | 20 MB a month⁶ | Sizes you choose | With Backup on | Both | MCP in the plugin⁷ |
| EWWW | Unlimited, on your server | Yes | Local backups | WebP free | — |
| Optimole | 2,000 visits a month | Resized by its CDN | Originals unchanged | Both | Settings only⁸ |
- Compression is 1¢ per 5 images plus 5¢ a call, from your AuditAE credit. Each size is compressed from its own file.
- Thumbnails are compressed in the free version; compressing the full-size original is Pro.
- Backups are on by default for new users; the page doesn't say which tier.
- Each thumbnail uses one credit.
- Since 6.6.0 (WordPress 6.9+), assistants connected through the WordPress MCP Adapter can optimize and restore images and run bulk jobs, with your WordPress user's permissions. ShortPixel also has a separate MCP server for public image URLs.
- About 200 images. Paid plans start at $4.99 a month billed yearly, or $5.99 billed monthly.
- Version 2.3 and later, one image at a time.
- Version 4.2.16 added AI agent support for Optimole's settings.
A dash means the plugin's WordPress.org page doesn't mention MCP or AI agents (checked 2026-10-14).
If you want every upload compressed automatically and converted to WebP, one of these plugins is the simpler choice, and AuditAE won't fight it: it stands aside while one is active. ShortPixel and Imagify can also be run by an agent inside WordPress. AuditAE fits when you want one agent to find the heavy images on any site, not only WordPress, fix them on demand and keep WordPress files where they are, from the same MCP server that runs your site crawl, Search Console queries and content edits.
FAQ
In two ways. The largest image in view is often the page's Largest Contentful Paint, which Google counts as good under 2.5 seconds, and a heavy hero can use most of that on a phone. And every image adds to the page's total weight. The waste is the gap between the file and the slot: a 4000 px photo in a 720 px column sends about 30 times the pixels the slot can show.
JPEG for photos and photo-like images, PNG for screenshots, logos and graphics with sharp edges or transparency. A photo saved as PNG is the most common mistake: in our test a photo-like PNG was 1,689 KB, and the same image as a quality-78 JPEG at 1440 px was 145 KB. On WordPress the same rule applies: WordPress keeps the JPEG or PNG format you upload.
WebP is the safe default for both photos and graphics, and every current browser supports it. AVIF is smaller again but slower to encode and not supported by every tool. Keep JPEG or PNG where a system needs them, such as a WordPress Media Library where the file must keep its name and type.
Resize it to the size it's displayed at first, then use lossy compression at a moderate setting (WebP around 75, JPEG around 75–82) and compare it with the original at 100% zoom. For screenshots and text, use lossless or near-lossless compression instead. AuditAE's optimize_image checks every output against the source and backs off when the difference would be visible.
1920×1080 is a common desktop screen, but a page isn't an image of the screen. Most content columns are 650–800 CSS pixels wide, and phones are narrower but have 2–3× denser screens. Size each image for the slot it fills: about 2× the slot's width, and 1920–2560 px only for full-width heroes.
Neither matters on the web. Browsers ignore the DPI setting and only use the pixel dimensions. A 1440×960 image at 72 DPI and at 300 DPI displays the same and weighs the same. DPI only matters for print.
Usually one of two things. Uploads wider or taller than 2560 px are scaled down to 2560 px and saved as a new -scaled file. And the thumbnail sizes WordPress creates are saved at quality 82 for JPEG (86 for WebP). If a theme displays a small size stretched to a large slot, it also looks soft. Upload images at the size you need, and check which size the theme uses.
1200×630 px works for most themes and is also the usual size for social share cards (og:image). Check your theme's own recommendation: some crop featured images to a different ratio.
Partly. It saves the thumbnail sizes it generates at quality 82 (JPEG) and scales uploads over 2560 px. It doesn't compress the file you uploaded, so a 1.5 MB JPEG under 2560 px stays 1.5 MB as the full size. An image optimizer plugin, or AuditAE's in-place compression, handles that file.
It depends on the limit you hit first. EWWW compresses on your own server with no image limit, ShortPixel's free plan gives 100 credits a month, Imagify's 20 MB a month and Smush's free version skips images over 5 MB. AuditAE's plugin is free, and its in-place compression is paid per image from your AuditAE credit.
Not on WordPress. In-place compression keeps every file's format and name, so pages, srcsets and share cards keep working with nothing to re-link. For other sites, optimize_image returns WebP by default, or the original format if you ask for it, as download links.
Run the citation report on your own brand.
See which prompts cite you on ChatGPT, Perplexity, Gemini, and Google AI Overviews — the first one’s free, no card.
Aaron is the founder of AuditAE. He has run AI-visibility audits for SEO agencies and in-house brand teams, and writes about how generative answer engines are reshaping the practice of search marketing.
Related reading
- 9 min readHow to Connect Claude to WordPress: Claude.ai, Claude Desktop and Claude CodeA step-by-step guide to connecting Claude to a self-hosted WordPress site over MCP: install a free plugin, pair the site, pick what Claude may change, then connect Claude.ai, Claude Desktop, Claude Code or Cursor. Includes first prompts to try, what it costs and how to fix the common errors.
- 8 min readWordPress SEO Audit: How to Run One in 2026 (and Actually Fix What's Broken)Most WordPress SEO audits end as 47-page PDFs nobody acts on. Here's a 30-minute audit that surfaces fixes you can ship the same day.
- 9 min readHow to Connect Claude or ChatGPT to Google Analytics (GA4): A Step-by-Step WalkthroughAsk Claude or ChatGPT about your GA4 traffic and Search Console queries in plain English. This walkthrough connects Google once in AuditAE, adds one URL to Claude.ai, ChatGPT or Claude Code, and shows the first questions to ask, what it costs (the Google tools are free) and how to fix the common errors.